Thursday, June 3, 2010

Compound Turbo Setup and New Rubber

I was trying to get an idea of where I would put the large turbo in my compound arrangement. I think this will be the basic layout. I need to verify that this will all fit with the thermostat housing assembled. The Top turbo is a Borg Warner s300sx3 66mm/91mm compressor & 79mm/73mm turbine with custom 1.10 a/r housing from full-race. On its own is good for ~775whp. The lower turbo is a Borg Warner S400sx4 80mm/110mm compressor & 96mm/88mm turbine w/ 1.32 a/r housing. This turbo is good for about 1175whp currently. I'm looking at 3 or 4 different compressor wheel upgrades. I will likely go with a compressor with the dimensions 88mm/118mm. The goal is to get it to support ~1250-1300whp at a pressure ratio of 2:1.

The whole reason for doing a twin turbo compound configuration is for more area under the curve. The small turbo will spool to ~30psi initially. This added exhaust energy will allow the larger turbo to spool up sooner. It will also only be spooling to 15psi, instead of 45psi. This all equates to a system that will come up on full boost 1500-2000rpm faster then the big turbo would by itself. This will then allow me to not have to rev the engine beyond 7500 rpm, increasing durability. The added benefit is the turbos are each only running at pressure ratios of 2:1. They will barely be breaking a sweat when I'm running 45psi and making 1200+whp :)

The engine is being solid mounted to the tube frame. I do have lots sheet metal to cut away to make room for all of the new piping. The down pipe from the small turbo will feed into the turbine housing of the large turbo. The compressor outlet of the large turbo will feed into the compressor inlet of the small turbo. The compressor outlet of the small turbo will go to the intercooler.


Got Meat?


Monday, February 22, 2010

Rear wheels are on the way. 18X12's with 345/35-18 Mickey Thompson drag radials! These are C6 Z06 replicas as I needed to keep it on a budget. The fronts will be 18X10.5 with 295/30-18's. No CCW's for a while, but eventually I'd like a set.

The wheels and tires that are on this car are the same that I will be running:

Friday, February 19, 2010

Not much progress. Just checking clearances to make sure the floor bars will be low enough to clear the transmission and motor. Its a tight fit. I also found out there are shelf options to move the shifter forward several inches. This along with a forward sweeping shifter should fix all those issues.


This shows the modified shifter mount that I'm going to use. I think I can move the shifter head about an inch further then is shown in these pictures.


Monday, February 1, 2010

True Mid Engine 280Z

I've pushed the 2JZ back 16" to improve overall vehicle dynamics. Benefits include:


Lower PMOI will allow vehicle to rotate more easily.
Increased weight on rear tires will help traction.
Reduced driveshaft length. (weight savings)
Reduced exhaust length. (weight savings)
Fuel Cell up front with very short fuel lines. (weight savings, gravity feed pumps)
Ducting radiator and intercooler airflow over top of car. (improved cooling and aerodynamics)
Rear Diffuser like shown below (improved aero)

Saturday, January 23, 2010

Finally Mocked up the 2JZ this afternoon. I need to figure out the driveline angle with this setup. The motor may need to be moved a couple inches higher. The only trouble with this is hood clearance for the turbo and intake manifold. I may have bulges for those two. I'm really pleased with how the new manifolds fit.


Friday, January 22, 2010

S300SX3 66mm

I purchased a Borg Warner S300SX3 with a 66mm inducer. This turbo will support about 800hp all out and spool quickly on the 2JZ. Should match a GT4088R in response but overpower it by about 100hp.

Here's the ultimate goal for the powerband here. This is a Stock block 2JZ with a precision 6765 0.96 a/r. This dyno was performed in 5th gear, so the spool up is a little sooner then you'd typically see with this turbo.


Justin

Thursday, January 21, 2010

Ebay Turbo Header Trouble

Here is a video showing the warped turbo flange. The cylinder head flange is dead straight though. Anyone else see this? The ebay sell wants me to fork out $36 to ship the manifold back to get a replacement. Should I just have this machined flat local?


My PNT intake manifold came in today. I'm very impressed by the build quality. The only negative I see is the plenum casting is a bit wavy so the polished finish doesn't look the greatest. I will likely have it powder coated or paint it with wrinkle finish. The runners have a nice tapered shape just like the factory veilside intake. The throttle body flange is very nicely machined. There is no casting flash or debris that I can find that would need to be cleaned up. All flanges are flat with good surface finish for gasket sealing.


Wednesday, January 13, 2010

Moving Right Along

Since my initiative to get this damn car together has set in, I've jumped into high gear ordering the remaining engine parts that I will need.

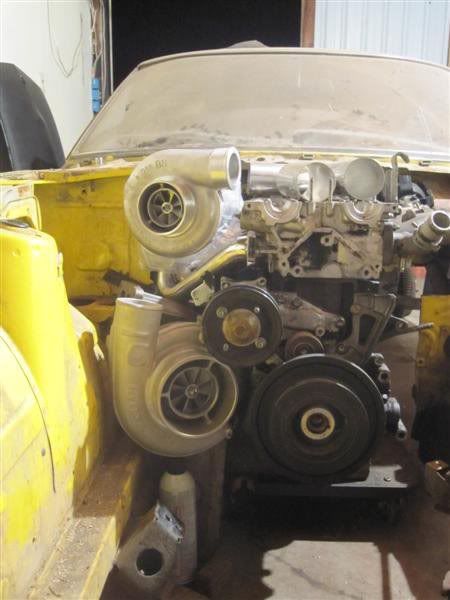
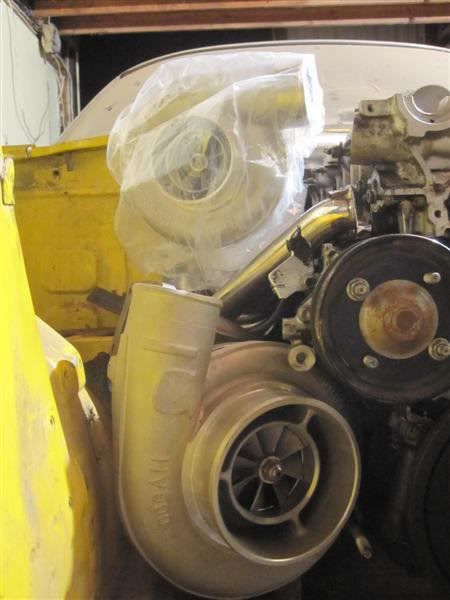
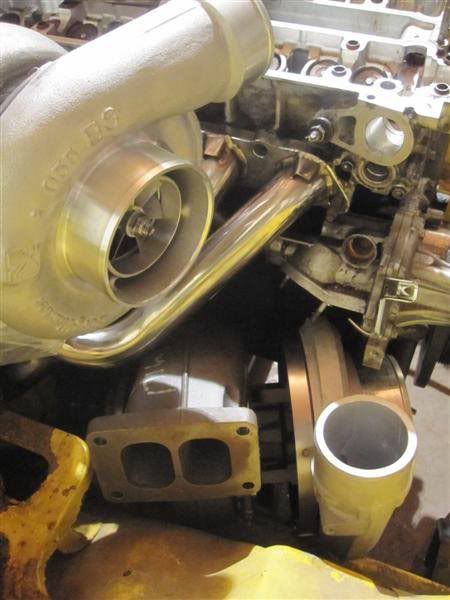
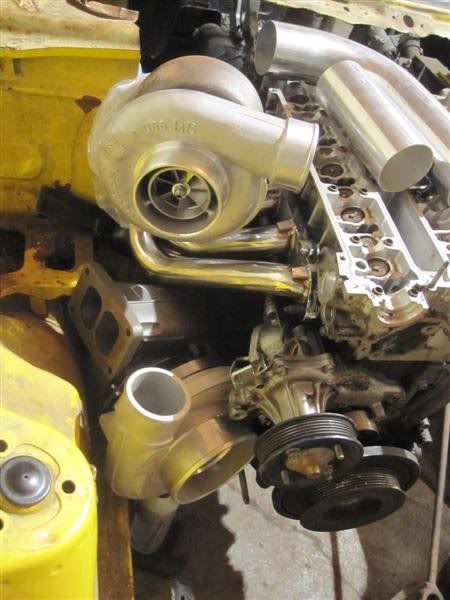
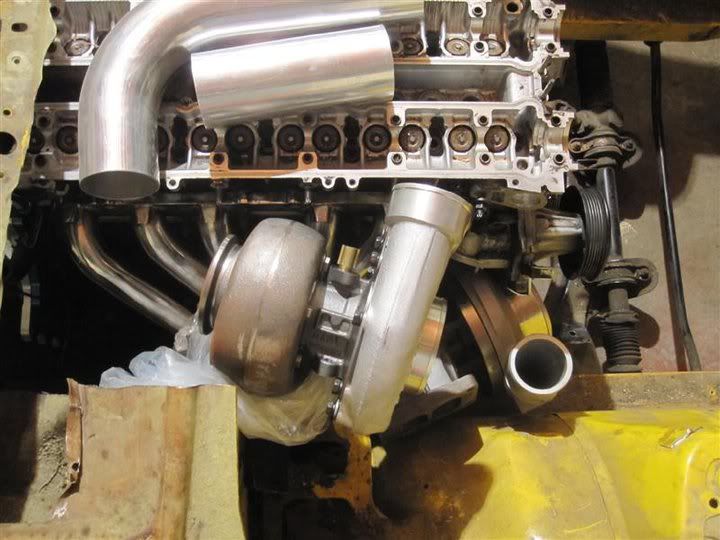
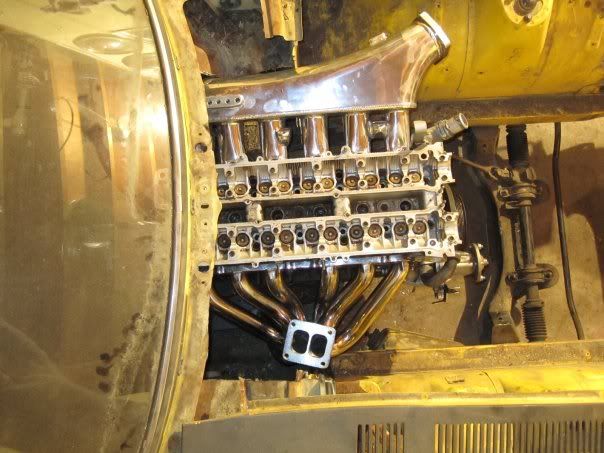
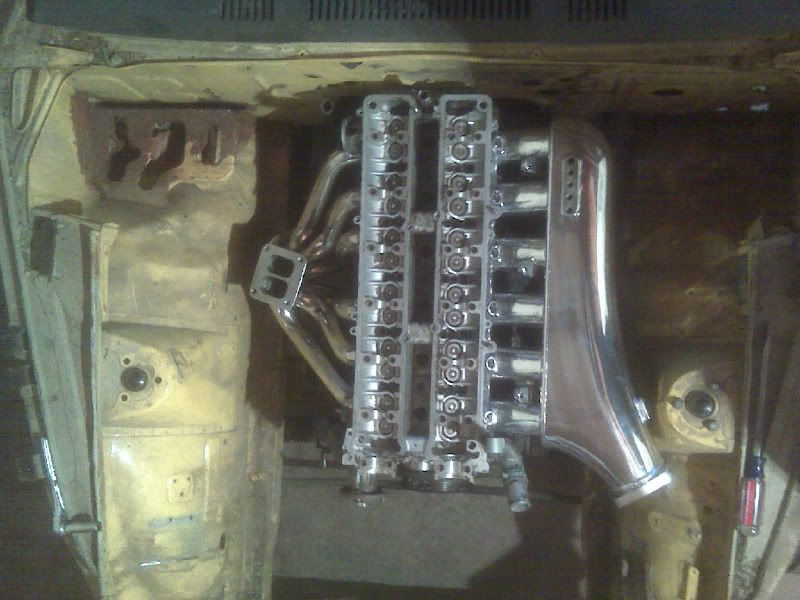
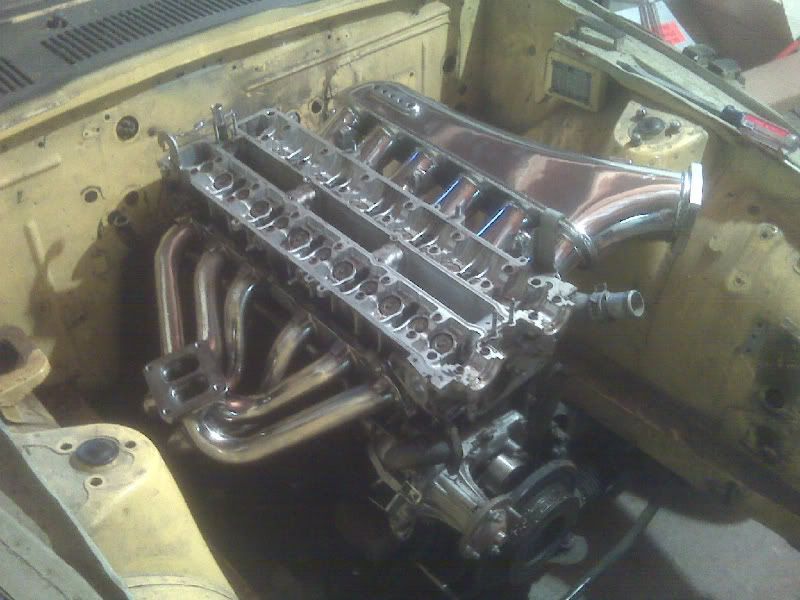
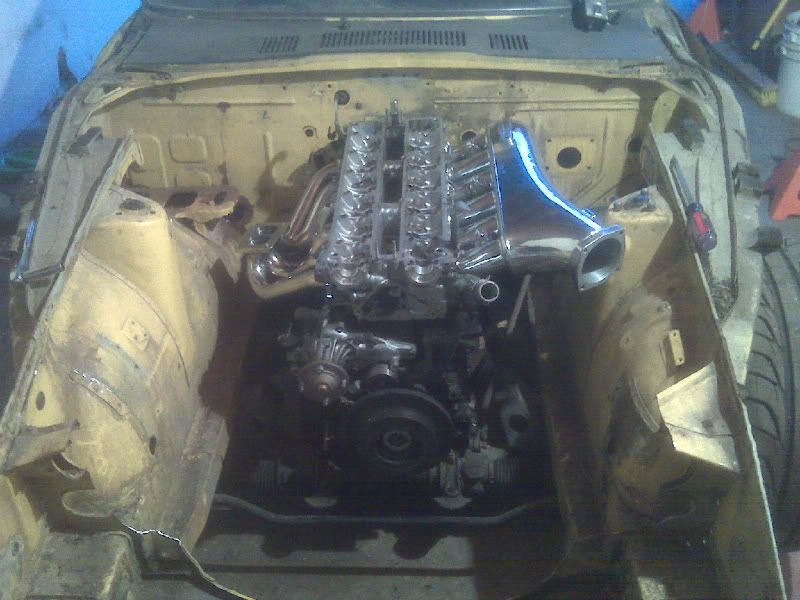
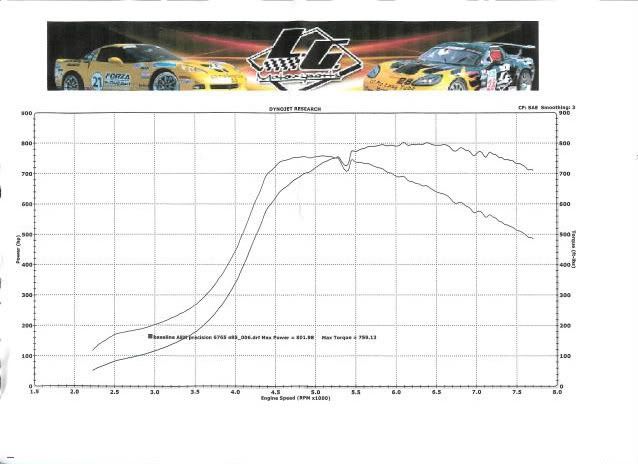
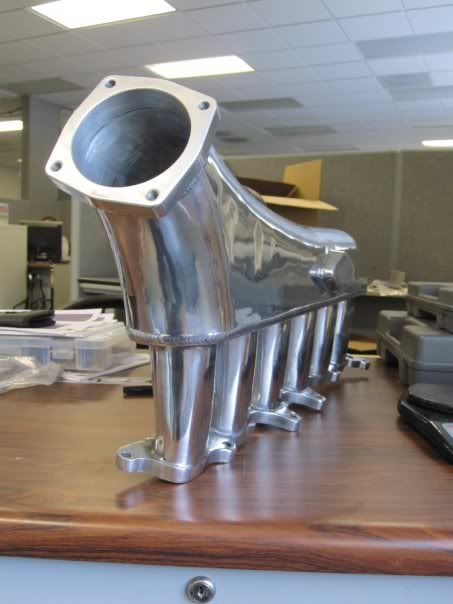
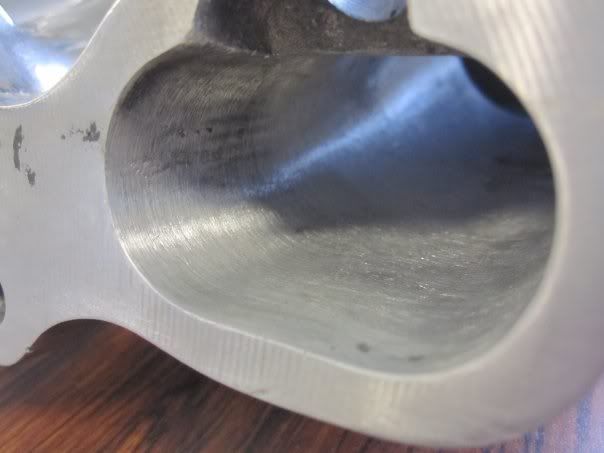
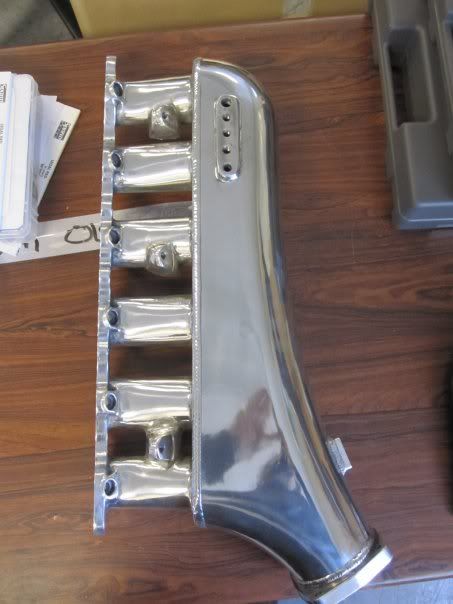
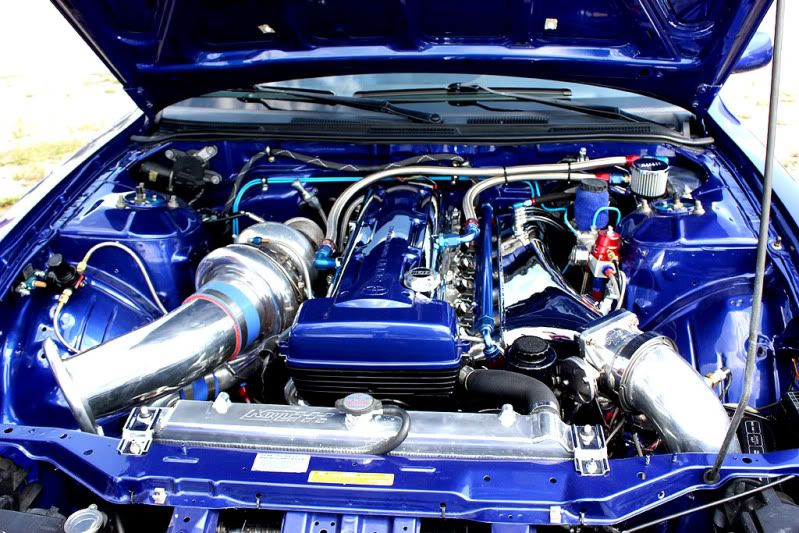
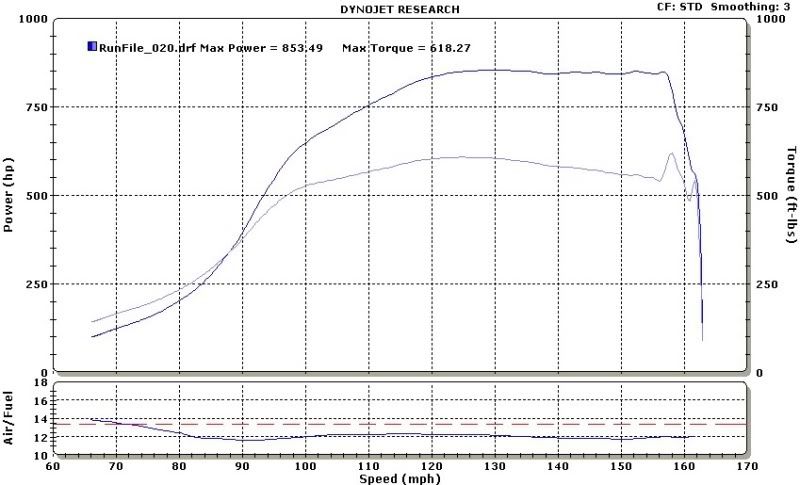
Tonight I purchased a Jun Style Intake Manifold with Q45 Throttle body for my 2JZGE. These have been proven by Big Daddy Performance to work very well. They are also very affordable off of ebay. Here is a picture of BD's S14 w/ a 2JZ swap. It uses the same intake and exhaust manifold that I have on order. He's using a GT4276 turbo. The below dyno chart is at 30psi on E85. I'm hopeful that I can achieve similar results with my build in terms of the power band. Here is a video of his latest drag racing pass:

http://www.youtube.com/watch?v=abb5g_49lcw


I've been trying to determine what fuel injectors to use on my ethanol powered powerplant. Ethanol takes 30% to 40% more fuel per horsepower when compared to gasoline. This means for me to make 1000hp on ethanol, I will need ~1350hp worth of fuel injectors. I've been shopping the market and everything in this size is expensive. I narrowed my selection down to 3 possible options:

1) Run One 220lb/hr low impedence simens injector per cylinder. This would make me have to run a injector driver due to the resistance of these injectors being lowered then the ECU can drive. This would run an additional $300 on top of the price of injectors. These injectors cost $160 per injector + shipping. So my total for this option would be $1260 + shipping.

2) Run Two 100lb/hr high impedance injectors per cylinder. The primary injector would run all the time with the secondary injector coming on under boost. This would get me the driveability I'm after while still providing the required volume of fuel while in boost. The trouble is I only have 10 injector drivers, and would again have to run a injector drive box with this option. So its the same cost as the above option in the end with more complexity.

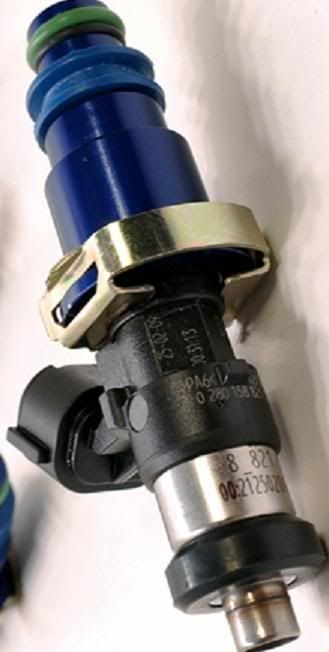
3) Run One 220lb/hr high impedance injector per cylinder. This does away with the need for the injector drive box, and will supply plenty of fuel. The new high impedence bosch injectors out on the market have very good control down the 1 millisecond. This will allow me to idle at a good air fuel ratio, yet having the flow for as much as 1500hp on ethanol. The only snag on these is they run $240 per injector plus pig tails through Injector Dynamics. They were the company that released these products to the general racing public. I just got word that Fuel Injector Clinic was selling the identical injector for less. They sell them for $195 per injector with pigtails. Now we are moving in the right direction! More research on the internet turned up the following two pictures that clearly show the bosch part number that FIC is selling: 0 280 158 821. A quick search on google turned up another vendor selling these injectors for $149 per injector with adapter and pigtail. So with a little research I've saved myself about $600 over buying the ID2000 injectors.

FIC Bluemax 2150cc injector:

Monday, January 11, 2010

I have a bit of a new strategy for my Datsun project. I have realized I have too many large time consuming projects that I need to complete to get the car back on the road. To simplify this, I will be dumbing down my project for now to get it back on the road. This means I will put on hold lots of the cool fabricated parts that I will eventually run. Once back on the road, I will tackle individual projects one at a time. Implementing them as quickly as possible to keep momentum. I need to make a rule of how long I can have the car undrivable. So I have a big push to get this car driveable by my birthday on June 24th. I think this is doable if I focus on MUST DO projects, instead of adding WHILE I'M AT IT projects along the way.

With this new directive, I have decided that I will be doing the stock internals 2JZ Toyota Engine in the dasun. It will be backed by the Gforce transmission, and twin plate Tilton clutch. I think this makes the most sense right now when compared to the amount of work that I need to do to make the Subaru EG33 engine work.

As part of my newly discovered plan, I'm going down a more traveled route with this engine. It will be using a T4 turbo charge with a off the shelf turbo manifold. You'd be amazed the quality of cheap chinese parts off of ebay ;) I will also be running a JUN style intake manifold from PNT Performance. This is actually one of the best 2JZGE intake manifolds offered. It is based on the original Veilside lower runners which have tappered nozzels to help make the intake airflow more laminar with increasing velocity. I should be ordering this part as soon as I can get KJS to setup a Ebay account as I've botched my "make offer" option on this part. I was trying to get it as cheap as possible, but didn't know after two attemps you can no longer bid on an item. It just so happens this is a permanent featured item in PNT's ebay store, so I'm kinda screwed buying it through my account.

I will likely get another pullout from the local wrecker as this 2JZGE I currently have needs a full rebuild. Its good for mockups for now though, so no rush to spend money just yet as I can get 90% there with what I have.

I've decided that I will replace the floorpan completely. This is straightforward enough and will give me a strong basis for the roll cage structure. I won't be doing a complete cage due to head clearance to the roof. I don't want to make this car require helmets to take it for a ride. Instead of a complete cage I will be doing strong X style door bars to a triangulated firewall structure. All of the suspension pickup points will eventually tie into the cage. I am leaving open the option to add A pillar bars at a later date if I decide that I want to make this a race car only with no street time.

This concludes my late sunday ramble. I have HW to do tomorrow night so there won't be any good pictures to add to the blog until atleast mid week.

/J

Friday, January 8, 2010

The legs are now attached to the bench seen in the previous post. Its so nice to have a welding table where I can be in a comfortable position while welding. This helps tremendously in the quality of my welds by improving posture. This helps make my movements more fluid and consistent.

On to cleaning up the shop and welding up the frame rail soon. I will need a argon tank refill soon. I may to that this weekend.

Tuesday, January 5, 2010

Little Update. I have been building up a welding table from a roll around cart that grandpa gave me. When I was taking off the caster wheels I noticed it had a "Property of US Postal service 1979" sticker on the bottom. I asked Gpa, but he doesn't remember how he acquired this one. Anyway, it will make a nice work bench once I've extended the legs. I need to clean up the welded surface and make sure it is level. Then I will weld the legs on and be done with it. I may add a Aluminum plate to the top so that I have a flatter welding surface. I'll have to see what I can get for scrap in this size.

The rear diff is out of the Z. I need to buy 4 more tall jack stands to support the front and back of the car before I'll be comfortable completely cutting out the remaining floor pan. Once that is done I will prep the passenger side rocker panel the same as the drivers side. I have drilled six 1" holes in the rocker panel so that I can roset the panel to the box tubing.


Followers